Recipe: a signup form that saves to a data table
A web form for your newsletter or loyalty club. n8n checks whether the email is already on your list, saves new people in an n8n data table, and shows a thank-you page. People who sign up twice get a friendly You are already on our list instead of a second row.
| Time needed | 30 minutes |
| You need | An n8n agent from LusoVPS (Sign in to n8n) and a data table called Newsletter signups with the columns name, email (both string) and signup_date (datetime) (how to create it) |
| Result | A form at a web address you can share; every new signup becomes one row in your data table |
No AI and no keys are needed for this recipe.
This is the finished workflow:
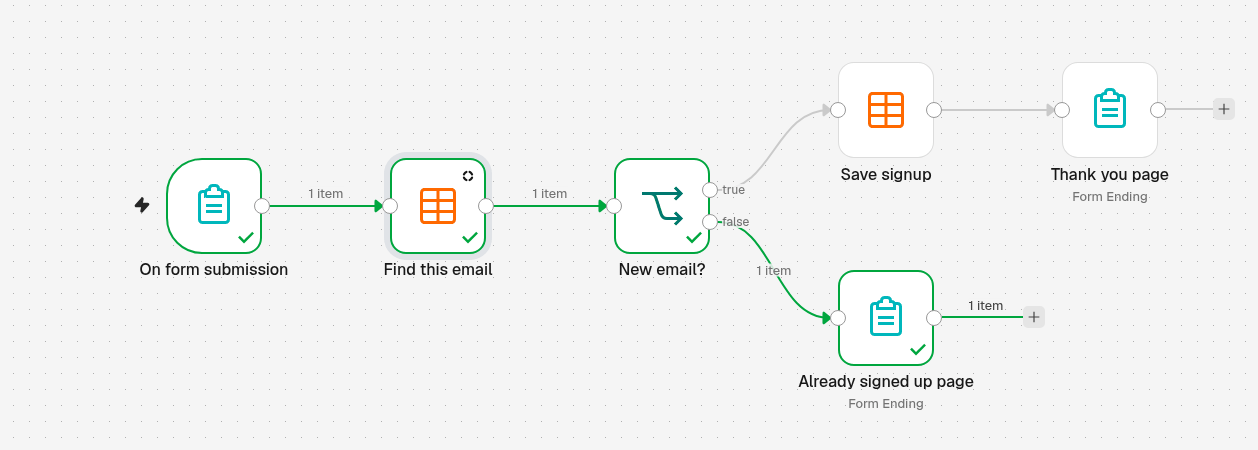
On form submission shows the form → Find this email looks for the email in the table → New email? splits the way: true goes to Save signup (adds the row) and Thank you page; false goes to Already signed up page.
1. Make the form
- Create a new workflow (the + at the top of the menu on the left → New workflow) and name it, for example Newsletter signup.
- Click Add first step and choose On form submission.
-
Fill it in:
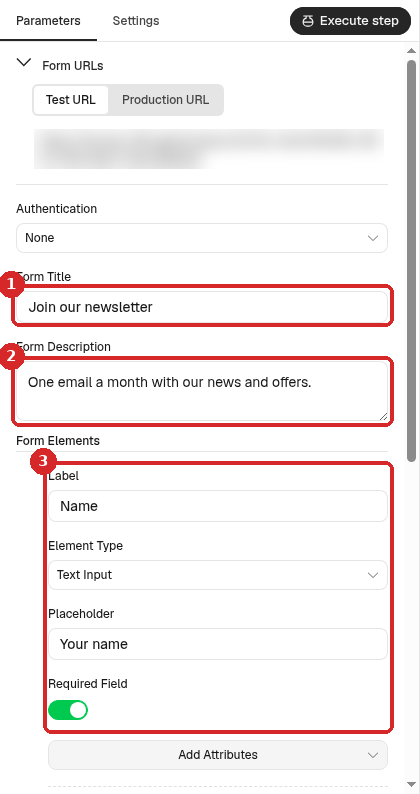
- Form Title:
Join our newsletter. - Form Description:
One email a month with our news and offers. - Form Elements: the first element has Label
Name, Element Type Text Input, PlaceholderYour nameand Required Field on. Click Add Form Element and make a second one: LabelEmail, Element Type Email, Placeholderyou@example.com, Required Field on.
- Form Title:
More about forms (dropdowns, dates, the test and production addresses): the order form recipe.
2. Look for the email in the table
- Close the panel. Click the + at the right of On form submission, type
data table, press Enter and choose Get row(s). - Click the step's name at the top of the panel and rename it
Find this email. -
Set it:
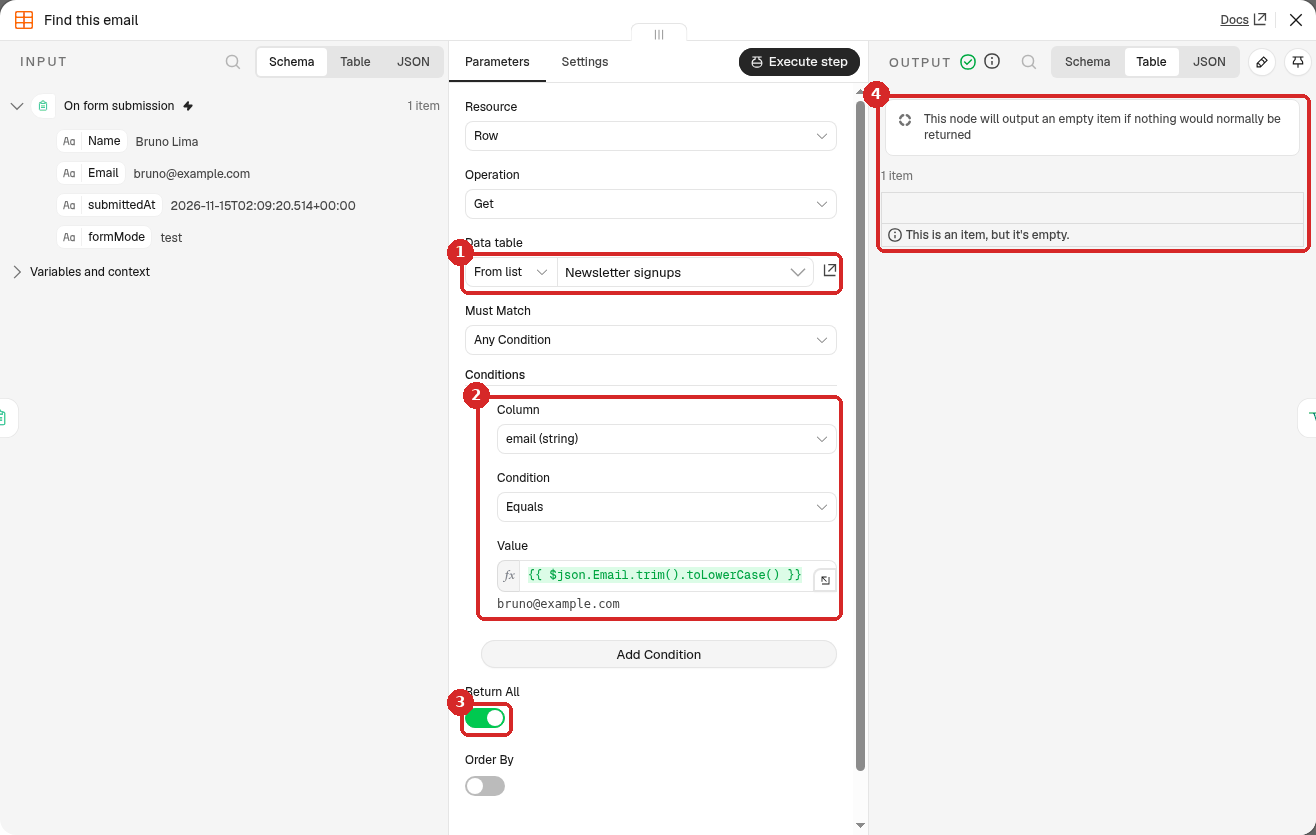
- Data table: From list → Newsletter signups.
-
Conditions: click Add Condition. Column: email (string), Condition: Equals, Value: click Expression and paste:
$json.Emailis what the person typed in the Email field..trim()removes spaces before and after it, and.toLowerCase()writes it in small letters, so Ana@Example.com and ana@example.com count as the same email. -
Return All: on.
- After a test, the OUTPUT for a new email says This node will output an empty item if nothing would normally be returned and shows one empty item (see the next point).
-
Open the Settings tab of the same step and switch Always Output Data on (2):
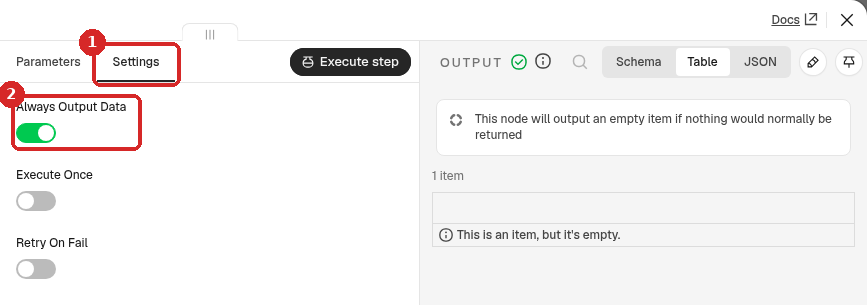
Without it, when the email is not in the table the step returns nothing and the workflow stops there. With it, the step returns one empty item, and the next step can decide.
3. Decide: new or already on the list
- Close the panel. Click the + at the right of Find this email, search
Ifand click it. Rename itNew email?. -
Set the condition:
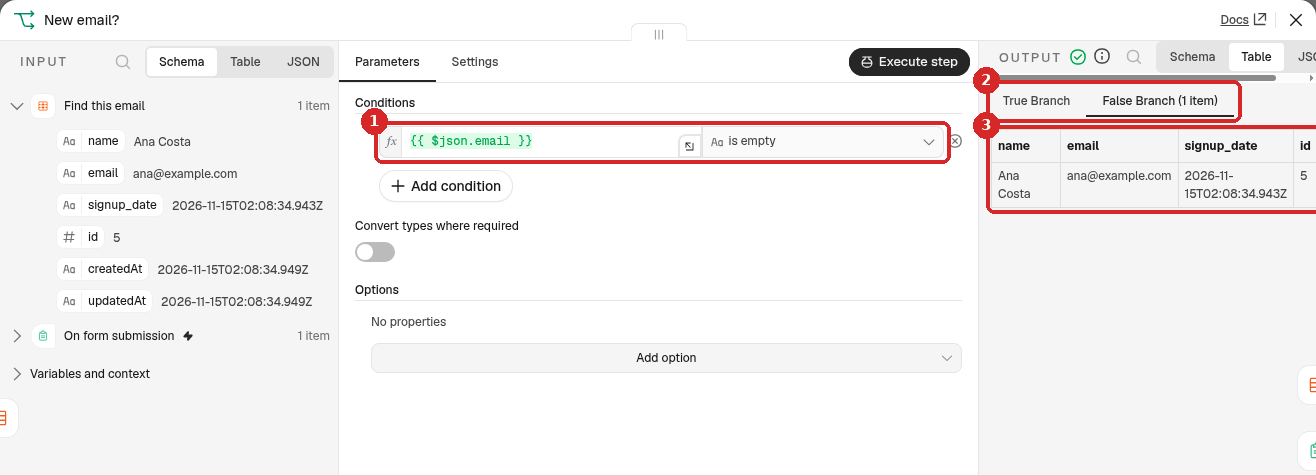
- In the first box, click Expression and type
{{ $json.email }}(the email column of the row that was found). In the second box choose String → is empty. - After a test, the OUTPUT has two tabs: True Branch (the email was not found: a new signup) and False Branch (the email is already in the table).
- Here we tested with an email that was already there: False Branch (1 item) shows the row that was found, Ana Costa.
- In the first box, click Expression and type
On the canvas, New email? now has two exits, true and false.
Red text in the condition
When you test with a new email, {{ $json.email }} turns red in the panel: the item is empty, so there is no email. That is expected; the condition is true.
4. Save new signups in the table
- Close the panel. Click the + at the right of the true exit of New email?, type
data table, press Enter and choose Insert row. Rename itSave signup. -
Set it:
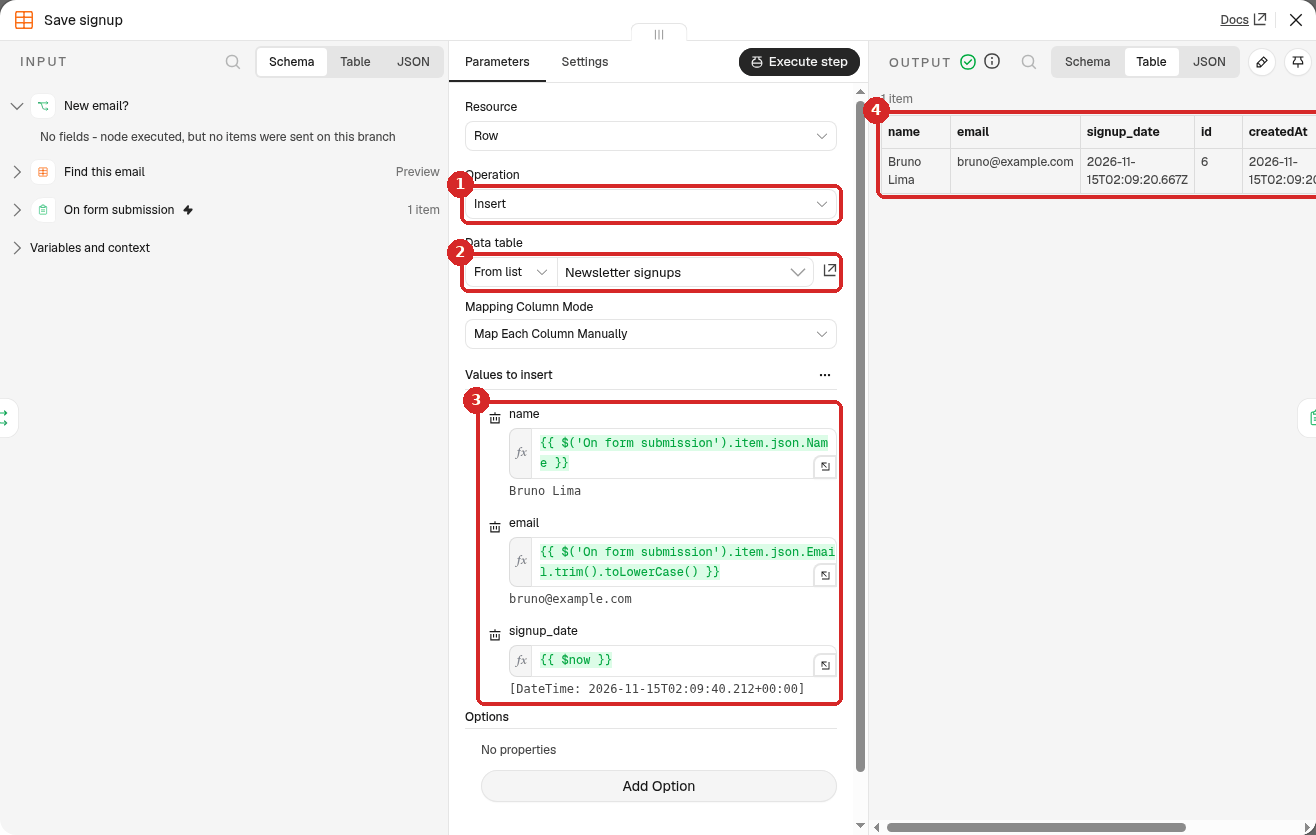
- Operation: Insert (already set).
- Data table: From list → Newsletter signups. n8n then lists your columns under Values to insert.
-
Fill the three columns. For each one, point at the box, click Expression and paste:
Column Value name {{ $('On form submission').item.json.Name }}email {{ $('On form submission').item.json.Email.trim().toLowerCase() }}signup_date {{ $now }}$('On form submission')takes the answers from the form step (why);$nowis the date and time of the signup. -
After a test, the OUTPUT shows the row that was added, with its new id.
5. Add the two end pages
-
Click the + at the right of Save signup, search
Form, click n8n Form and choose Form Ending. Rename itThank you pageand set it: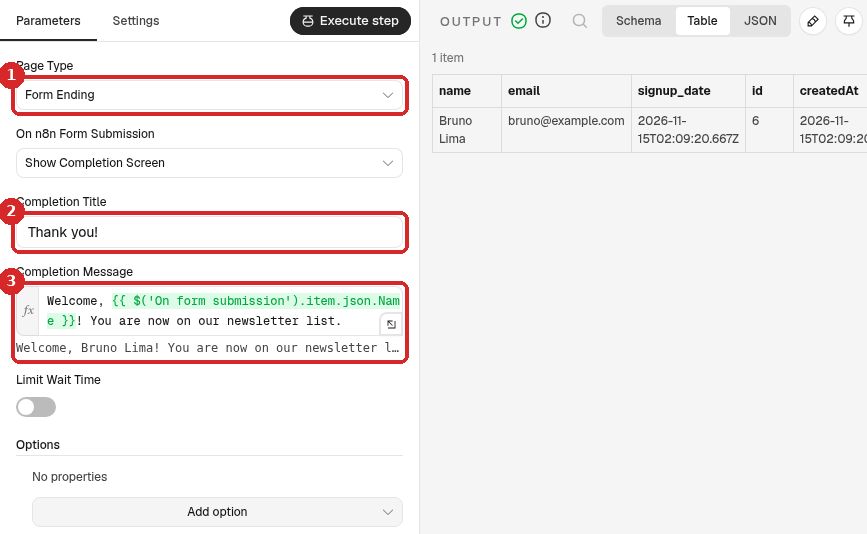
- Page Type: Form Ending (and On n8n Form Submission: Show Completion Screen).
- Completion Title:
Thank you! -
Completion Message: click Expression and paste:
-
Click the + at the right of the false exit of New email? and add a second Form Ending the same way. Rename it
Already signed up page. Completion Title:You are already on our list. Completion Message (Expression):
6. Test it with three signups
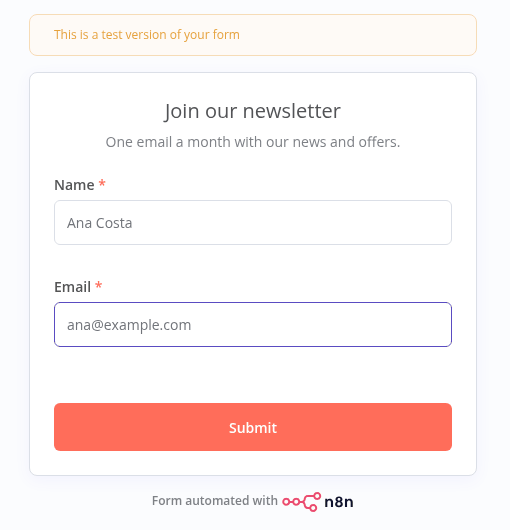
- Close the panel and click Execute workflow at the bottom of the canvas. The test form opens in a new browser tab, with the yellow banner This is a test version of your form.
-
Fill it in and click Submit:
-
A new email gets the thank-you page:
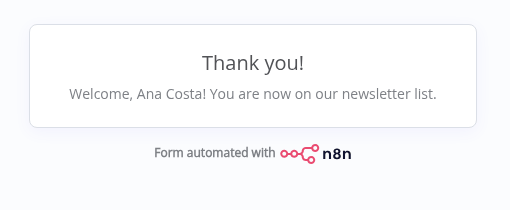
Each Execute workflow accepts one test signup. We did three:
| Name | Email typed | Page shown | Rows in the table after |
|---|---|---|---|
| Ana Costa | ana@example.com |
Thank you! | 4 |
| Bruno Lima | bruno@example.com |
Thank you! | 5 |
| Ana Costa | Ana@Example.com |
You are already on our list | 5 (no new row) |
The third one was recognised as a duplicate even with capital letters, and saw this page:
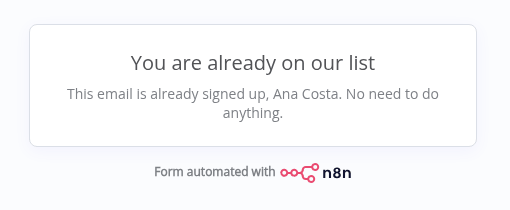
7. Publish it
Click Publish at the top right, then Publish in the window. Then share the Production URL of On form submission (with /form/, not /form-test/), exactly as in step 7 of the order form recipe.
Check that it worked
Open your data table (Overview → Data tables → Newsletter signups). Our table had our 3 earlier rows plus the 2 new signups, and no second row for Ana:
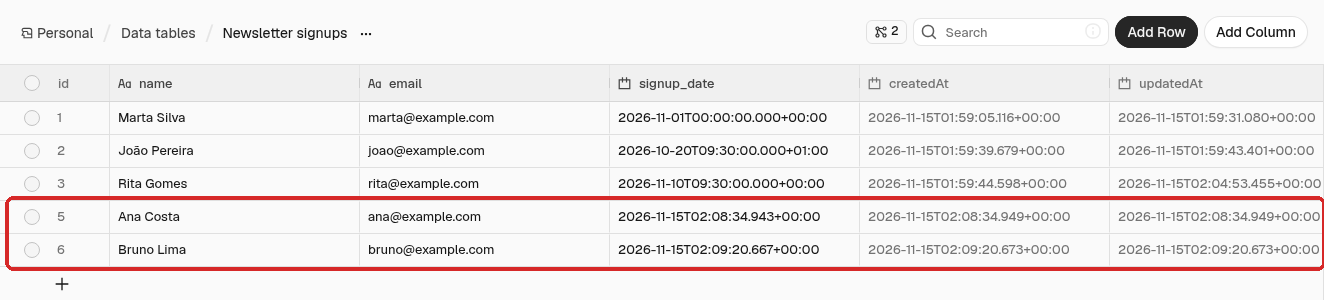
The emails are saved in small letters, and signup_date is the moment of the signup.
Make it yours
- Loyalty club: rename the table and the texts, and add a form element such as
Birthday(Date) plus a matching datetime column in the table. - Hear about each signup: add a Telegram step after Save signup (how to send Telegram messages).
- A report every week: count the new signups every Monday and get them on Telegram.
Common problems
Every signup is saved, even duplicates
Check Find this email: the condition must be email Equals {{ $json.Email.trim().toLowerCase() }}, and Save signup must save the email the same way (.trim().toLowerCase()). Emails saved by hand with capital letters will not match: write them in small letters in the table.
Nobody is ever saved, the workflow stops after Find this email
Always Output Data is off in the Settings tab of Find this email. Without it, a new email gives no item and nothing runs after it.
The thank-you page shows the wrong text
The true exit of New email? must go to Save signup and Thank you page, the false exit to Already signed up page. Look at the small labels next to the two exits on the canvas.
The form says: Problem loading form
The workflow is not published, or you shared the test address. See the order form recipe.