Log in without a password: add an SSH key
An SSH key lets your computer log in to your agent's server over SSH and SFTP without typing the service password.
| Time needed | 5 minutes |
| You need | A computer with a terminal (macOS or Linux; Windows 10/11 PowerShell, see step 1) and your client area login |
| Result | ssh and sftp log in to your agent without asking for a password |
Share only the public key
ssh-keygen creates two files. id_ed25519.pub is the public key: it is the only one you paste anywhere. id_ed25519 (without .pub) is the private key: it works like a password. Never send it, paste it or upload it.
1. Create a key on your computer
Open Terminal (macOS: Applications → Utilities; Linux: your terminal app), type this command and press Enter:
Press Enter three times to accept the questions.
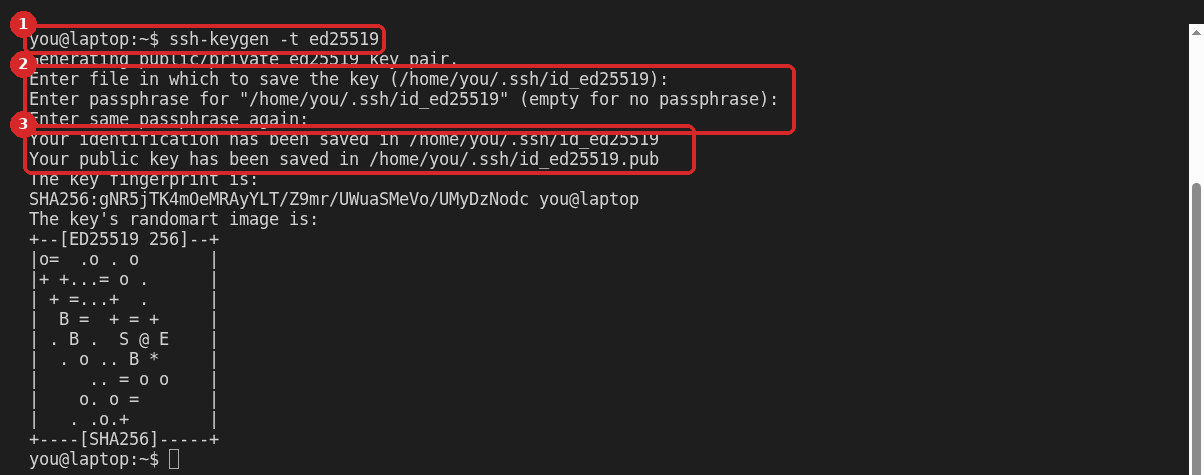
- The command you typed.
- The three questions: where to save the key (Enter keeps the normal place,
.ssh/id_ed25519in your home folder) and a passphrase, twice. A passphrase is optional. In this guide we left it empty. - Where the two files were saved: the private key
id_ed25519and the public keyid_ed25519.pub.
If you already have a key, ssh-keygen asks whether to overwrite it. Answer n and use the key you have.
Windows
Windows 10 and 11 have the same ssh-keygen and ssh commands in PowerShell. Not shown in this guide: we tested on Linux only.
2. Copy the public key
Show the public key:

Select the whole line, from ssh-ed25519 to the end (here you@laptop, the name of your user and computer), and copy it. It is one long line.
3. Paste it in the client area
Sign in to the client area, open Services → My Services, click your agent and open the Settings tab in the Manage panel. Scroll down to SSH access.
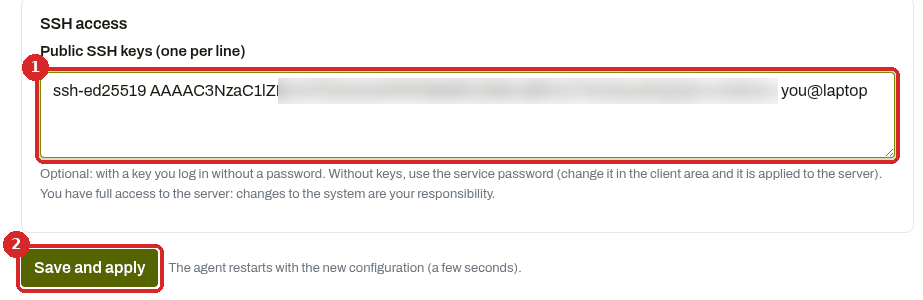
- Paste the line in Public SSH keys (one per line). To use several computers, paste one key per line.
- Click Save and apply.
The other fields can stay as they are: empty API key and Bot token fields keep the values your agent already has.
Save and apply applies the whole page
The page waits while all the settings on this page are applied to your agent. Do not close it until the confirmation appears.
4. Wait for the confirmation

The page reloads with Settings saved and applied to your server. Your key is now in the SSH access field.
The key is saved for this agent only. If you have more than one agent, add it in the Settings of each one.
5. Connect without a password
Type your SSH command from the Overview tab, as in Connect with SSH:
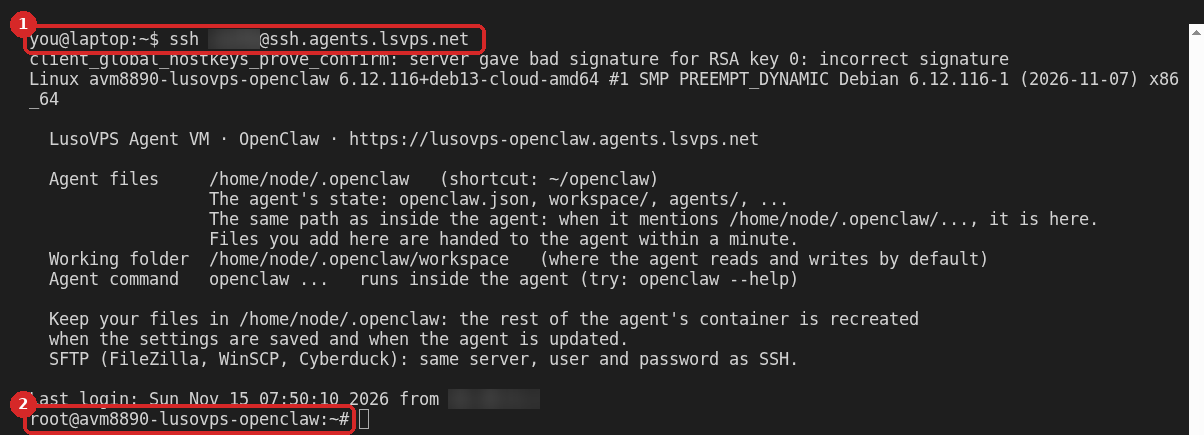
ssh vm123@ssh.agents.lsvps.net(with your own user, here blurred).- No password question: you are logged in as
rootstraight away.
Check that it worked
The …'s password: question does not appear any more, for ssh and for sftp.
Remove a key
Open Settings, delete the key's line from Public SSH keys, and click Save and apply. When we tested this, the key stopped working right after Settings saved and applied to your server. and the server asked for the password again. An empty field removes all keys.
Common problems
It still asks for the password
- Check that Settings shows your key in Public SSH keys and that you saw Settings saved and applied to your server. after saving.
- Check that you pasted the line from
id_ed25519.pubof this computer, complete, on one line, starting withssh-ed25519. - You can still log in with the service password meanwhile.
I lost my computer or my private key
Remove the key in Settings (see Remove a key) so it no longer opens your server, then create a new key on your new computer.