n8n: ask for approval before acting (Wait node)
Some things should not happen automatically: a refund, a discount, a social media post. The Wait step pauses the workflow until you decide. n8n sends you a link on Telegram, you open it on your phone, choose Approve or Reject, and the workflow continues with your answer.
| Time needed | 30 minutes |
| You need | An n8n agent from LusoVPS (Sign in and build your first AI agent), your Telegram bot saved in n8n (step 1 of the contact form recipe) and your numeric Telegram ID. To send a test request, a terminal with curl, as in Receive data with a webhook |
| Result | A refund request arrives, you get Refund request from Rui Costa ... Approve or reject here: (link) on Telegram, and the workflow continues only after you choose |
This is the finished workflow:
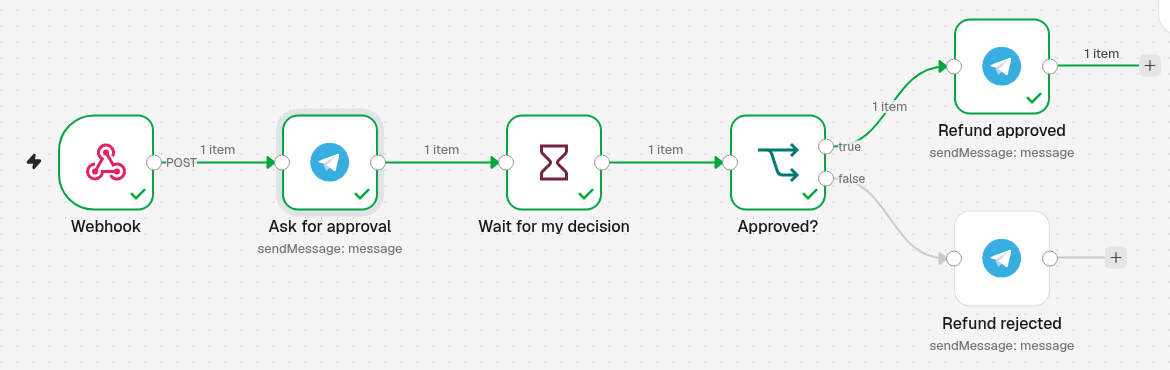
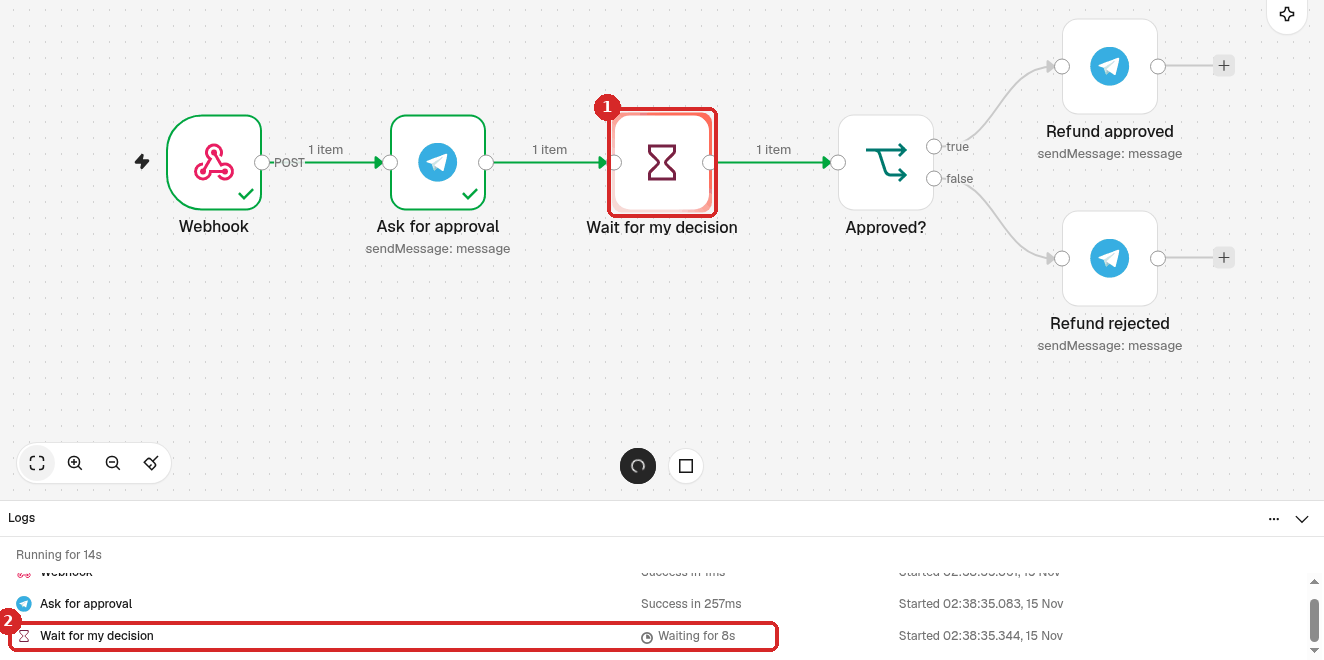
Webhook receives the request → Ask for approval sends you the details and a link on Telegram → Wait for my decision pauses until you answer the form behind the link → Approved? checks your answer → Refund approved or Refund rejected (here: a Telegram message; in real life, the action itself, for example an email to the customer).
Anyone with the link can answer
The approval link is not protected by a password. Send it only to yourself (your own Telegram chat), and do not forward it.
1. Receive the request (Webhook)
- Create a new workflow and name it, for example Refund approval.
-
Click Add first step, choose On webhook call and set it:
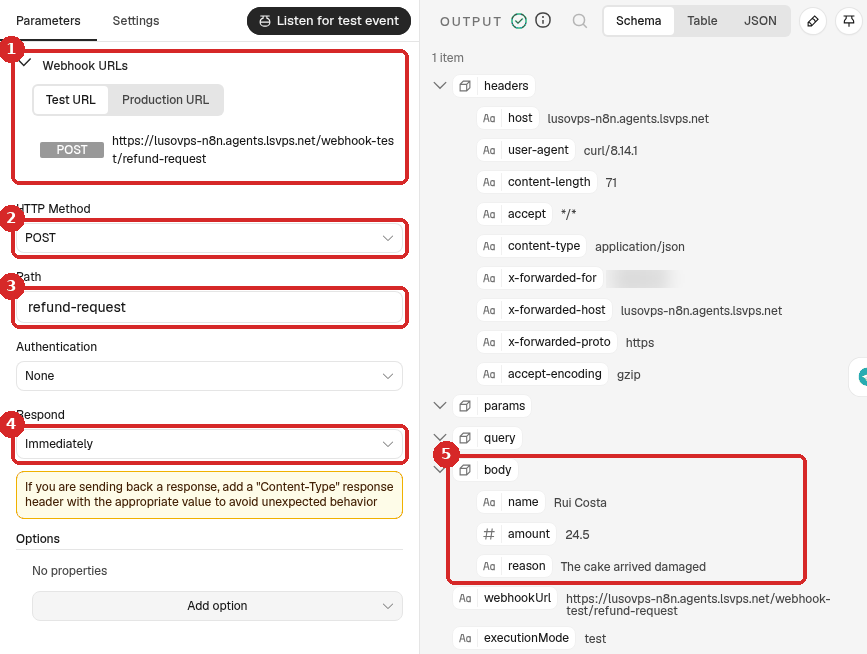
- Webhook URLs: the test and production addresses (more about them).
- HTTP Method: POST.
- Path:
refund-request. - Respond: Immediately. Your website gets its answer at once; the decision can come hours later.
- After a test (step 6), the OUTPUT shows what was sent, under body: name, amount and reason.
Any other trigger works too: a form, a schedule, an AI step that writes a draft for you to check.
2. Send yourself the request and the link
- Add a Telegram step after Webhook: search
Telegram, choose Send a text message and rename itAsk for approval. -
Set it:
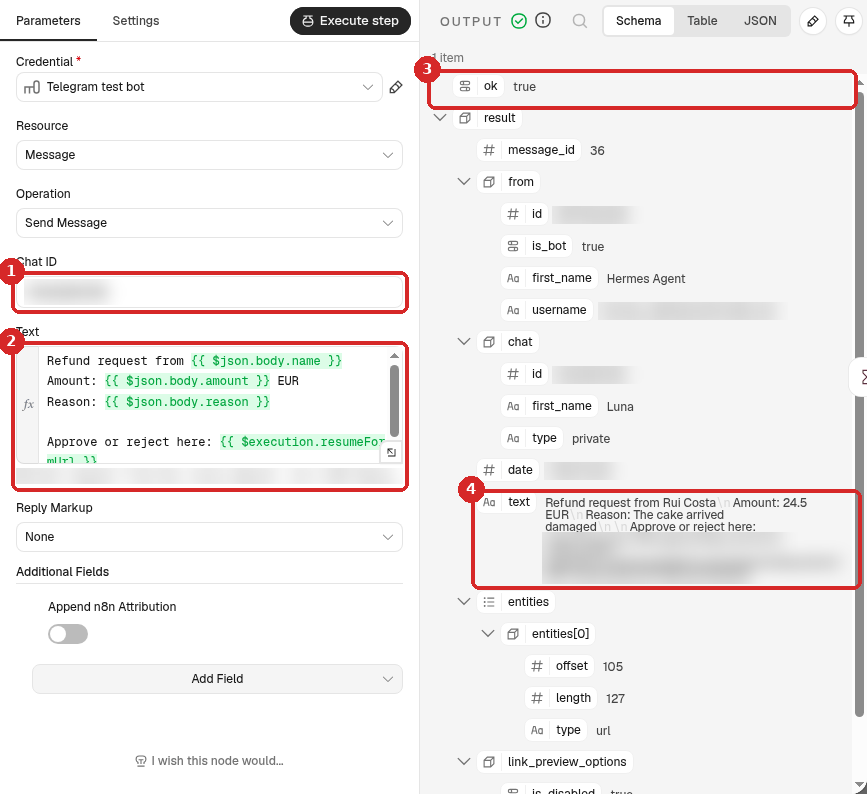
- Chat ID: your numeric Telegram ID. (Credential: your Telegram bot.)
-
Text: click Expression and paste:
Refund request from {{ $json.body.name }}
Amount: {{ $json.body.amount }} EUR
Reason: {{ $json.body.reason }}

Approve or reject here: {{ $execution.resumeFormUrl }}
{{ $execution.resumeFormUrl }}is the link to the approval page of this run. Each run gets its own link. -
After a test, the OUTPUT shows ok true: the message was sent.
- The text that arrived, with the link (blurred here).
Also switch Append n8n Attribution off under Additional Fields → Add Field.
3. Pause until you decide (Wait)
- Add a Wait step after Ask for approval (search
Wait). Rename itWait for my decision. -
Set it:
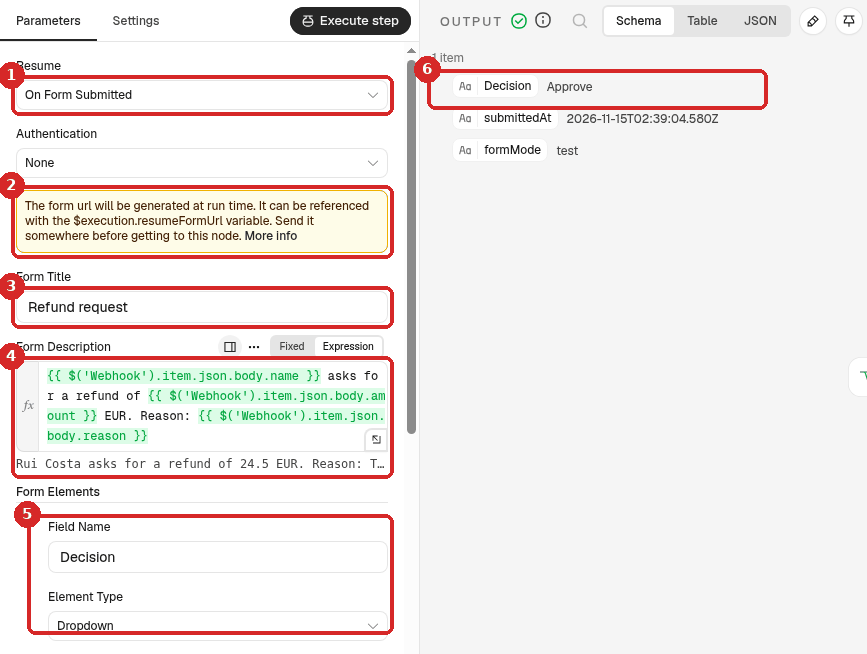
- Resume: On Form Submitted. The workflow continues when someone sends the form behind the link.
- n8n reminds you: The form url will be generated at run time. It can be referenced with the $execution.resumeFormUrl variable. Send it somewhere before getting to this node. That is what step 2 does.
- Form Title:
Refund request. -
Form Description: click Expression and paste:
-
Form Elements: Field Name
Decision, Element Type Dropdown. Under Field Options, add two options:ApproveandReject. Switch Required Field on. - After you answer, the OUTPUT shows your choice: Decision Approve.
Limit Wait Time
Lower in the same panel, Limit Wait Time sets a maximum time to wait for your answer. We did not test it for this guide.
4. Act on the answer (If)
- Add an If step after Wait for my decision and rename it
Approved?. -
Set the condition:
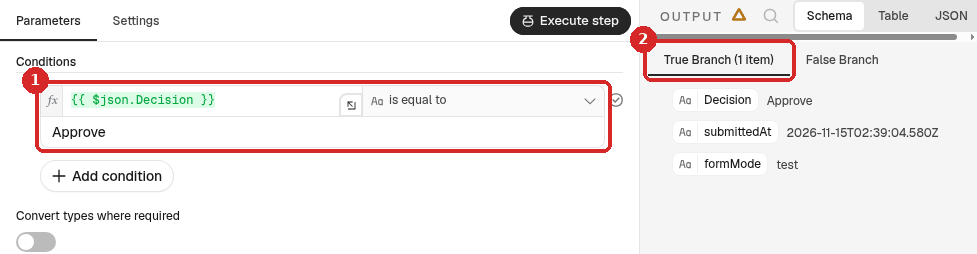
- First box: Expression
{{ $json.Decision }}. Operator: String → is equal to. Value:Approve. - After a test with Approve, the item is in True Branch (1 item).
- First box: Expression
-
Click the + at the right of the true exit and add what should happen after an approval. We used a Telegram Send a text message step,
Refund approved, with the text (Expression): -
Do the same on the false exit:
Refund rejectedwithRejected: no refund for {{ $('Webhook').item.json.body.name }}.
5. Test it
- Click Execute workflow at the bottom of the canvas. The Webhook waits for one test call.
-
Send a test request to the Test URL, for example with curl (use your own address):
curl -X POST https://yourname-n8n.agents.lsvps.net/webhook-test/refund-request \
  -H 'Content-Type: application/json' \
  -d '{"name":"Rui Costa","amount":24.50,"reason":"The cake arrived damaged"}'
The answer is
{"message":"Workflow was started"}. -
The Telegram message with the link arrives. On the canvas, Wait for my decision is highlighted (1) and the Logs say Waiting (2): the workflow is paused.
-
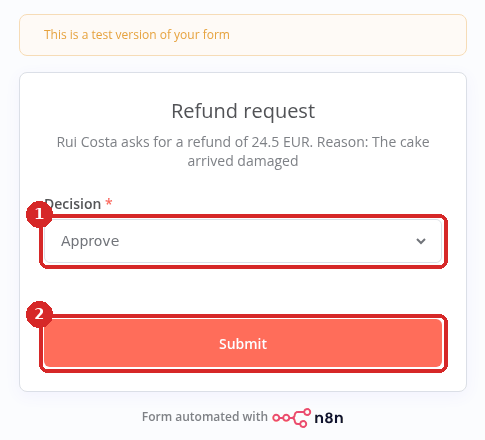
Tap the link in Telegram. The approval page opens (during a test it has the yellow banner This is a test version of your form). Choose your Decision (1) and click Submit (2):
-
The page says Form Submitted - Your response has been recorded, and the workflow continues. In our test the run took about 36 seconds in total, most of it waiting for us. The approval message arrived on Telegram:
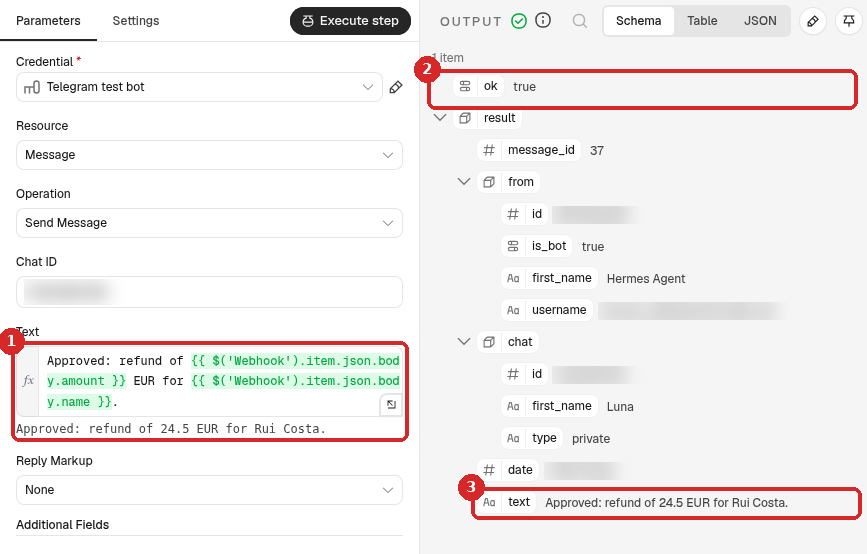
- The text with the values from the request.
- ok true: Telegram accepted it.
- The message that arrived: Approved: refund of 24.5 EUR for Rui Costa.
We ran the test a second time with Sofia Reis and chose Reject: the run went through Refund rejected and Telegram got Rejected: no refund for Sofia Reis.
6. Publish it
Click Publish at the top right, then Publish in the window. Give your website the Production URL of the Webhook (with /webhook/, not /webhook-test/), as in Receive data with a webhook. Every request then sends you its own approval link.
Note
For this guide we tested with Execute workflow only and did not leave the workflow published.
Check that it worked
- The Telegram message has a link, and opening it shows your approval page with the request details.
- After Submit, the next steps run: you get the Approved or Rejected message.
- In Executions, the run is finished (not waiting any more).
Common problems
The link only says: Form Submitted - Your response has been recorded
Someone already answered this request. Each link works once: when we opened a used link again, n8n showed only this message, without the form.
The Telegram message has no link
The text must be an Expression and contain {{ $execution.resumeFormUrl }} exactly, and the Wait step must be set to Resume On Form Submitted.
The test does not start: the webhook answers with an error
Click Execute workflow before you send the test request: the Test URL works for one call after each click. See Receive data with a webhook.